Last Updated: March 2026
- Light scuffs: Apply leather conditioner directly to the scratch with a soft cloth and buff gently. Most surface scuffs disappear entirely with one or two applications.
- Medium scratches with colour loss: Clean the area, apply a leather recolouring cream matched to your bag's shade, blend outward with a cloth, then seal with conditioner.
- Deep gouges: Use a leather filler applied in thin layers, allow each layer to dry fully, then colour-match with a leather dye or recolouring cream and finish with conditioner.
- Always test first: Apply any product to a hidden area and wait 30 minutes before treating the visible scratch. Colour mismatch is the most common DIY mistake and is difficult to reverse.
- Act quickly: Scratches worsen over time. Exposed fibres dry out and crack at the scratch edges, and dirt accumulates in the mark. Address scratches as soon as you notice them.
WHAT YOU NEED TO KNOW
- Scratch depth determines the repair method: There is no single fix for all scratches. The right approach depends entirely on whether the scratch is a surface scuff, a medium mark with colour loss, or a deep gouge that has broken through the leather layer.
- Most scratches are fixable at home: Light and medium scratches on genuine leather respond well to DIY repair using widely available products. Only very deep or structurally complex scratches require a professional.
- Leather type affects the repair approach: Full-grain and top-grain leather repair more readily than bonded or corrected-grain leather. Suede and nubuck require completely different products and must not be treated with oil-based conditioners or fillers.
- Colour matching is the hardest part: For scratches with colour loss, the repair product must closely match the original leather shade. Testing on a hidden area before treating the visible scratch is not optional. It is essential.
- Conditioning is both repair and prevention: Regular conditioning keeps leather fibres flexible and resistant to surface scratching. Well-conditioned leather shows fewer scratches and repairs more easily when they do occur.
A scratch on a leather bag you use every day is one of the most frustrating things that can happen to it.
The good news is that leather is a natural material with a remarkable ability to absorb oils and respond to treatment.
This means most scratches, even ones that look serious at first, can be significantly improved or fully repaired at home.
The key is knowing what type of scratch you are dealing with before choosing a method.
This guide covers the full process from scratch assessment through to finished repair, with step-by-step instructions for light scuffs, medium scratches, and deep gouges, plus a section on the mistakes that turn a manageable scratch into a bigger problem.
How to Assess the Scratch Before You Start
Run your fingernail gently across the scratch before reaching for any product.
This single test tells you almost everything you need to know about the repair approach required.
- Light surface scuff: Your nail glides over it without catching. The colour is mostly intact. The scratch is in the finish layer only, not in the leather itself. These respond to conditioner alone in most cases.
- Medium scratch: Your nail catches slightly. Some colour has been lost, and the area looks lighter or duller than the surrounding leather. The top layer of the hide has been marked but not broken through. These need conditioner plus a recolouring product.
- Deep gouge: Your nail catches clearly, and you can feel depth. The colour is gone, and you can see lighter fibres or a raw texture underneath. These require a leather filler before any colouring or conditioning work.
Also, check the leather type before starting.
The repair methods in this guide apply to genuine, full-grain, and top-grain leather.
Understanding what full-grain leather actually means in terms of surface structure helps explain why it responds differently to scratches than corrected-grain or bonded leather. The natural grain layer is intact and actively responds to conditioning and repair.
If your bag is suede or nubuck, do not use any of the oil-based or filler methods below. Those materials require dedicated dry-cleaning brushes and suede-specific erasers.
What You Need
Gather your materials before starting any repair.
Having everything at hand prevents stopping mid-repair with the product already applied to the leather.
For light scratches:
- Soft lint-free cloths, two or more
- Leather conditioner
For medium scratches:
- Soft lint-free cloths
- Leather cleaner or mild soap solution
- Leather recolouring cream or balm matched to your bag's colour
- Leather conditioner
For deep gouges:
- Soft lint-free cloths
- Leather cleaner
- Flexible leather repair compound, also sold as leather filler
- Small spatula or cotton swab for applying filler
- Fine sanding sponge or 600-grit sandpaper for smoothing filler once dry
- Leather dye or recolouring cream matched to your bag's colour
- Leather conditioner
Method 1: Fixing Light Surface Scuffs
Light scuffs that sit in the finish layer of the leather rather than the hide itself are the easiest scratches to fix.
In many cases, a single application of leather conditioner is all that is needed.
The oils penetrate the fibres around the scratch and cause them to swell slightly, reducing or eliminating the visible mark.
Materials Needed
- Leather conditioner
- Two soft lint-free cloths
Steps
- Clean the area around the scratch with a dry cloth to remove any dust or surface dirt. Do not apply conditioner over a dirty surface.
- Apply a small amount of leather conditioner to a soft cloth. Work it gently into the scratched area using small circular motions, blending outward to the surrounding leather.
- Allow the conditioner to absorb fully at room temperature for at least 15 minutes.
- Buff the area with a clean dry cloth to remove any excess conditioner and assess the result.
- If the scratch is still visible, repeat the process. Most light scuffs respond within two to three applications.
Safety Tips
- Do not apply conditioner with too much pressure. Gentle circular motions are sufficient. Pressing hard does not improve absorption.
- Do not use heat to speed up the drying process. Allow the conditioner to absorb naturally at room temperature.
- Do not use olive oil as a substitute for leather conditioner. It goes rancid inside the leather fibres over time and causes long-term damage.
For more details on how to soften stiff leather using conditioner and other methods, the guide covers the full conditioning process, including which products work best for different leather types.
Method 2: Fixing Medium Scratches With Colour Loss
When a scratch has removed colour from the surface of the leather, conditioner alone will not restore the original appearance.
The scratch itself may improve with conditioning, but the lighter or duller patch where the colour has gone will remain visible.
A leather recolouring cream or balm matched to your bag's shade fills in the colour loss and blends the repair into the surrounding leather.
Materials Needed
- Leather cleaner or mild soap solution
- Leather recolouring cream or balm in a matching colour
- Cotton swab for applying colour
- Soft lint-free cloths
- Leather conditioner
Steps
- Clean the scratched area and the surrounding leather thoroughly. Use a leather cleaner or a mild soap solution on a damp cloth, then allow the leather to dry completely before proceeding. The full guide on properly cleaning your leather bag covers safe cleaning methods for different leather types and finishes.
- Test your recolouring cream on a hidden area of the bag. Apply a small amount to the inside base or the underside of a strap, allow it to dry for 30 minutes, and check the colour match in natural light before proceeding.
- Apply a very small amount of recolouring cream to the scratched area using a cotton swab or your fingertip. Work it directly into the mark first, then blend outward using a soft cloth in slow circular motions.
- Allow the colouring to dry for at least 15 minutes before assessing. The colour deepens slightly as it dries, so let it reach its final shade before deciding whether to add another layer.
- If the scratch is still visible, apply a second thin layer using the same process. Building up thin layers gives a more seamless result than applying one thick coat.
- Once the colour repair is complete and fully dry, apply a light coat of leather conditioner over the repaired area and the surrounding leather to seal and blend the finish.
Safety Tips
- Never skip the patch test. A colour mismatch on a visible area of the bag is harder to fix than the original scratch.
- Work with thin layers. Over-application produces a heavy, unnatural finish that sits on top of the leather rather than blending into it.
- Do not rub aggressively while the colouring is still wet. Let each layer dry fully before adding more or buffing.
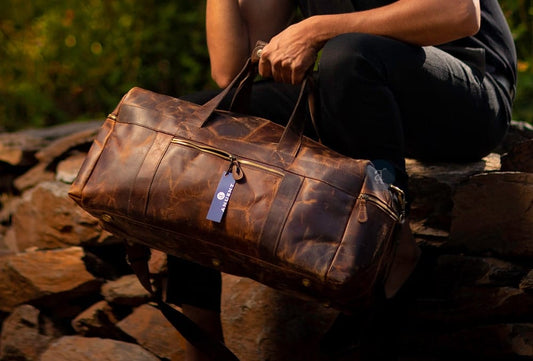
EXPERTLY CRAFTED GENUINE LEATHER
Leather Bags Built to Last and Age Beautifully
Every Anuent bag is made from genuine leather designed to develop character with age. Free shipping to USA, UK, and Canada. Free monogramming on every order.
Method 3: Fixing Deep Gouges
Deep gouges that have broken through the surface layer of the leather require a physical filler before any colouring or conditioning work can be done.
Applying colour directly to a deep gouge without filling it first produces a result that is visually improved but structurally unresolved.
The colour sits in the depression rather than on a smooth surface and will wear away more quickly than the surrounding leather.
Materials Needed
- Leather cleaner
- Flexible leather repair compound
- Small spatula or cotton swab
- Fine sanding sponge
- Leather dye or recolouring cream in a matching colour
- Soft lint-free cloths
- Leather conditioner
Steps
- Clean the scratched area thoroughly and allow it to dry completely. Remove any loose fibres from inside the gouge using a dry cotton swab. Do not pull at them. Lightly sweep them away.
- Apply a thin layer of flexible leather filler to the gouge using a small spatula or cotton swab. Work the filler into the scratch and smooth the surface so it sits level with the surrounding leather. A slight underfill is preferable to a raised surface.
- Allow the first layer to dry fully at room temperature. This typically takes 20 to 30 minutes depending on the depth of the gouge and the product used. Do not rush this step.
- If the gouge is still visible after the first layer dries, apply a second thin layer using the same process. Build up layers gradually until the surface is level. Most deep scratches require two to three layers.
- Once the filler has dried fully, lightly smooth the repaired area with a fine sanding sponge using minimal pressure. You are smoothing the filler surface only, not abrading the leather itself. Wipe away any dust with a dry cloth.
- Apply leather dye or recolouring cream as described in Method 2. Begin with a patch test on a hidden area. Build colour in thin layers until the repaired area matches the surrounding leather.
- Once the colour repair is dry, apply leather conditioner over the full repaired area and the surrounding leather to seal, protect, and blend the finish.

Safety Tips
- Use a flexible leather filler specifically designed for leather repair. Rigid fillers crack as the leather flexes during use.
- Sand with the lightest possible pressure. You are smoothing the filler only, not working on the leather beneath it.
- Allow every layer of filler and colour to dry completely before adding the next. Rushing layers produces a lumpy, uneven finish.
If the scratch has also caused colour fading across a larger area of the bag beyond the immediate scratch site, the guide on restoring faded leather covers how to address widespread colour loss and surface dullness that goes beyond a localised scratch repair.
For cases where a full recolouring of the bag would produce a better result than a patch repair, the guide on how to recolor a leather bag covers the complete process from surface preparation through to sealing the new colour.
What Not to Do When Fixing a Scratched Leather Bag
The methods above work reliably when followed correctly.
The following approaches are widely suggested online, but either do not work or cause additional damage.
- Olive oil: Temporarily darkens and softens the area around a scratch, which can reduce its visibility for a short period. Over time, olive oil goes rancid inside the leather fibres, causing odour and accelerating deterioration. Do not use it.
- Toothpaste: Mildly abrasive and sometimes suggested for scuffs on shoes. On a leather bag, it is too abrasive for the surface finish and will dull or remove the protective layer around the scratch rather than repairing it.
- Household moisturiser: Can temporarily soften leather, and some people report light scratch improvement. However, most moisturisers contain fragrance, alcohol, and other ingredients that are not safe for leather over repeated use. A dedicated leather conditioner is safer and more effective.
- Applying colour without cleaning first: Any dust, oil, or dirt on the leather surface will be sealed in under the colouring product, creating an uneven finish and reducing adhesion. Always clean before colouring.
- Skipping the patch test: The most consistently made mistake. Colour mismatch on a visible area of the bag is far more difficult to fix than the original scratch, and some recolouring products are very difficult to remove once applied.
- Using permanent markers or pen: Occasionally suggested as a quick colour fix for dark leather. Marker ink sits on the surface rather than penetrating it, produces an obviously unnatural finish, and bleeds when the leather is subsequently cleaned.
When to Take the Bag to a Professional
Most light and medium scratches on genuine leather are within reach of a careful DIY repair.
The following situations are better handled by a professional leather restorer.
- The gouge is very deep and has exposed the underlying hide structure or backing material
- The bag is made from patent leather, suede, nubuck, or another specialist finish that requires different products and techniques
- The colour required is complex, such as multi-tone, antique, or hand-painted leather, and cannot be matched with standard recolouring products
- Multiple DIY attempts have not improved the result, or the patch test colour match is noticeably off
- The scratch is on a visible structural seam or handle attachment, where the leather has also weakened
A professional leather restorer can re-dye and refinish the full bag surface for a seamless result on complex repairs, and can also assess whether underlying damage needs addressing before the surface repair is applied.
How to Prevent Scratches on a Leather Bag
Prevention is significantly easier than repair.
The following habits reduce the risk of scratches and make repairs easier when they do occur.
- Store in a dust bag: Keeping the bag in a breathable dust bag or cotton pillowcase when not in use protects the surface from contact with rough surfaces and hardware from other stored items.
- Condition regularly: Well-conditioned leather is more flexible and more resistant to surface scratching. Condition every three to six months. Dry, brittle leather scratches more easily and repairs less readily than leather that is regularly maintained.
- Be aware of contact surfaces: Rough denim, metal hardware from other bags, and abrasive surfaces are the most common causes of everyday scratches. Carrying the bag away from these surfaces reduces the accumulation of minor marks significantly over time.
- Address scratches promptly: An unaddressed scratch allows the exposed fibres to dry out and the edges to begin cracking. A light scratch treated the same day remains a light scratch. Left for weeks, it becomes a medium or deep repair.
The full guide on keeping leather bags crack-free covers both conditioning schedules and storage practices that reduce all forms of leather surface damage, including scratching.
Frequently Asked Questions
Can scratches be removed from a leather bag?
Yes, most scratches on genuine leather bags can be significantly reduced or fully repaired at home, depending on their depth.
Light surface scuffs often disappear entirely with leather conditioner alone.
Medium scratches respond well to leather cream and gentle buffing.
Deep gouges require a leather filler and colour matching, but can still be restored to a near-invisible finish with the right products and patience.
What is the best product to fix scratches on a leather bag?
For light scratches, a quality leather conditioner is all you need.
For medium scratches with colour loss, a leather recolouring cream or balm matched to your bag's shade works well.
For deep gouges, a leather filler applied before colouring gives the most effective result.
Products from brands such as Saphir, Leather Honey, and Bickmore are reliable choices across all severity levels.
How do you fix deep scratches on a leather bag?
Deep scratches require a three-stage process: clean the area, apply a flexible leather filler to the gouge in thin layers, allowing each to dry fully, then colour-match the repaired area using a leather dye or recolouring cream.
Finish with a leather conditioner to seal and blend the repair.
Results depend heavily on how closely the colour product matches the original leather shade, so always test on a hidden area before treating the visible scratch.
Does leather conditioner remove scratches?
Leather conditioner removes light surface scuffs and significantly reduces the visibility of shallow scratches by replenishing the oils in the leather fibres and causing them to swell slightly around the mark.
For scratches that have broken the surface layer or removed colour, conditioner alone is not enough.
A recolouring product or leather filler is also needed in those cases.
Can you use Vaseline to fix scratches on leather?
Vaseline can temporarily reduce the visibility of very light scratches on dark leather by adding moisture and a slight sheen to the area.
However, it is not a repair product and does not restore the leather fibre structure or colour.
It can also attract dust and cause surface buildup over time.
A dedicated leather conditioner is a more effective and safer alternative.
How do you prevent scratches on a leather bag?
The most effective prevention measures are storing the bag in a dust bag or pillowcase when not in use, conditioning the leather every three to six months to maintain fibre flexibility, keeping the bag away from sharp objects and rough surfaces, and addressing any new scratches promptly before the exposed fibres dry out and worsen.
When should you take a scratched leather bag to a professional?
Take the bag to a professional leather restorer when the scratch is very deep and has exposed the underlying layer of the hide, when the bag is made from a specialist leather such as patent, suede, or nubuck, when the colour match required is complex, or when DIY attempts have not improved the result.
A professional can re-dye and refinish the full bag surface for a seamless result on difficult repairs.
Do scratches on leather get worse over time?
Yes.
Unaddressed scratches on leather worsen over time because the exposed fibres at the scratch site dry out faster than the surrounding leather, leading to cracking at the edges of the mark.
Dirt and oils from regular use also accumulate in the scratch and darken it, making it more visible.
Addressing scratches promptly, even with basic conditioning, significantly reduces the risk of permanent damage.
BUILT TO LAST
Genuine Leather Bags That Age With Character
Every Anuent bag is expertly crafted from genuine leather that responds to care and develops a natural patina with use. Free shipping to USA, UK, and Canada. Free monogramming on every order.